
A huge thanks to Marian of Seams To Be Sew for organizing this hop! Halloween is such a fun holiday to create for; I appreciate her giving us all a chance to do just that!


Next, I made two very quick projects for this hop, with the hope you will make them yourselves for your home.
First up, I've created the easiest pumpkin you'll ever construct. I've seen variations of this around the web, but here's my version:

And here's how to make it:


You can hang it on your pumpkin to make it more Halloween-y, or hang it on a cabinet, doorknob or elsewhere in your house.
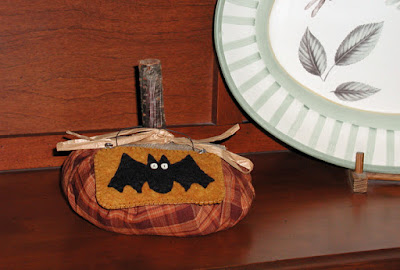
The FREE instructions to make the ornament can be downloaded HERE. I promise, it's very easy to make! And, you could make it using black + any WoolFelt color you have on hand.
I hope you have fun making either or both of these projects, and/or the Spooky Skies Table Mat!
First, I want to share a pattern from my 16" Round Table Mat Series (the .pdf pattern is available for purchase). It's called "Spooky Skies" and is the perfect accent for your Halloween table! The table mat is made in WoolFelt and cotton fabric.


The .pdf pattern can be purchased from
either my Craftsy or Etsy shops.
__________________________________________________________
Next, I made two very quick projects for this hop, with the hope you will make them yourselves for your home.
First up, I've created the easiest pumpkin you'll ever construct. I've seen variations of this around the web, but here's my version:

- Cut a 16" circle from your choice of fabric.
- Sew a loose running stitch in floss or strong thread about 1/4" in from the edge of the circle. If you are using one-sided fabric, sew on the wrong side. I used homespun, which is the same on both sides.
- Stuff a plastic grocery bag (hopefully from your recycling bin) with other plastic bags, or crushed-up paper. Tie the handles of the bag together. (Your finished pumpkin will measure approx. 9" wide x 4" tall, so keep that in mind when stuffing the bag.)
- Place the filled bag in the center of your fabric circle.
- Stick a stick in the center, pushing it into your stuffed bag.
- Pull the gathering threads and tie off around the stick. (You're basically making a large yo-yo).
- Cut a "collar" from burlap, WoolFelt, or other fabric (I used burlap cut in a flower shape). Cut an "X" in the center.
- Slide the collar over the stick, and glue down onto your formed pumpkin. I used all-purpose white glue.
- Glue a piece of raffia or twine around the base of the stick, where it meets the collar. Tie the raffia into a bow.
- A there you go...a squishy, bumpy, fabric pumpkin!
__________________________________________________________


I hope you have fun making either or both of these projects, and/or the Spooky Skies Table Mat!

__________________________________________________________
I will respond to all comments, unless you are a No Reply Blogger who doesn't post an email address.
And finally...
Be sure to visit all the other creative people on today's list, and for the rest of the hop!
Featured Haunts Today, Tuesday October 20:
Quilt In Piece
The Quilting Queen Online
Elizabeth Coughlin Designs (that's me!)
Apple Avenue
Quilt Doodle Doodles
Quilt In Piece
The Quilting Queen Online
Elizabeth Coughlin Designs (that's me!)
Apple Avenue
Quilt Doodle Doodles
Complete List of Haunts:
Featured Haunts on
Friday, October 16
A Stitch In Time
Marjorie’s Busy Corner
Ravelly
Words and Stitches
Quilted Delights
A Stitch In Time
Marjorie’s Busy Corner
Ravelly
Words and Stitches
Quilted Delights
Featured Haunts On
Monday October 19
Charm About You
Quilting Affection
Moose Stash Quilting
Gracie Oliver Arts
Kwilt Krazy
Debbie
Charm About You
Quilting Affection
Moose Stash Quilting
Gracie Oliver Arts
Kwilt Krazy
Debbie
Featured Haunts On
Tuesday October 20
Quilt In Piece
The Quilting Queen Online
Elizabeth Coughlin Designs
Apple Avenue
Quilt Doodle Doodle
Quilt In Piece
The Quilting Queen Online
Elizabeth Coughlin Designs
Apple Avenue
Quilt Doodle Doodle
Featured Haunts On
Wednesday October 21
Tea Time Creations
Grandma’s Stories
In The Boon Docks
Just Because Quilts
Just Let Me Quilt
Tea Time Creations
Grandma’s Stories
In The Boon Docks
Just Because Quilts
Just Let Me Quilt
Featured Haunts On
Thursday October 22
Quilt Shop Gal
Jane’s Quilting
U Can Quilt 2
RMS Handcrafted
Everyone Deserves A Quilt
Life In The Scrapatch
Quilt Shop Gal
Jane’s Quilting
U Can Quilt 2
RMS Handcrafted
Everyone Deserves A Quilt
Life In The Scrapatch
Featured Haunts On
Friday October 23
Free Motion By The River
Quilt Art
Joan E
It Seams To Be Sew
From This To That
Free Motion By The River
Quilt Art
Joan E
It Seams To Be Sew
From This To That
Featured Haunts On
Monday October 26
Beads & Birds
Needled Mom
Fun Threads
Pampered Pettit
Vrooman’s Quilts
Pam G
Beads & Birds
Needled Mom
Fun Threads
Pampered Pettit
Vrooman’s Quilts
Pam G
Featured Haunts On
Tuesday October 27
Tweety Loves Quilting
Sandy
How Art You
Cate’s Place
Feather Your Nest
Why Knot Kwilt
Tweety Loves Quilting
Sandy
How Art You
Cate’s Place
Feather Your Nest
Why Knot Kwilt
Featured Haunts On
Wednesday October 28
Bumbleberry Stitches
Meadow Brook
Sew Many Yarns
In Stitches & Seams
Seams To Be Sew
Bumbleberry Stitches
Meadow Brook
Sew Many Yarns
In Stitches & Seams
Seams To Be Sew


